Turmeric has long been used in both Chinese and Indian medicine systems due to its powerful anti-inflammatory, antiseptic and antibacterial properties. Modern studies have also shown the fantastic health benefits of turmeric.
The main active ingredient is curcumin, which is so powerful that it matches some anti-inflammatory drugs’ effectiveness. Turmeric is the new superfood in our Western societies. It contains iron, manganese, vitamin B6, lowers cholesterol, and proven itself as a cancer treatment, both preventing and destroying cancerous cells.
And the best thing is that you can grow your own turmeric in your garden! It’s not only a super healthy plant, but it’s also gorgeous. The whole plant is edible; the roots ground up to produce turmeric powder, the leaves can be used as a wrap for steamed fish, and even the flowers can be eaten. Let’s see ten tips on how to grow your own turmeric!
1. Use store-bought turmeric roots

Growing turmeric is easy, fun, and rewarding. Turmeric will handle anything you throw at it, returning from drought and sailing through floods. To start with, buy some large, less shriveled roots from your local Farmers Market. Leave them in a warm, dry place out of the direct sun until shoots appear and the rhizomes turn more orange at the tips.
It will take about a month. Where the rhizomes are naturally attached to each other, break them apart and leave them rest for 3-5 days more until the severed edges are dried down.
2. Plant the rhizomes into containers
Once the roots are ready to be planted, you will need a shallow but wide pot filled with a blend of potting mix and good quality compost. Press the roots shoot-side up into the pot but make sure to plant them more shallow. Plant each seedling about 12 to 16 inches apart. Turmeric is not a deep-rooted plant, and the rhizomes grow horizontally. Water carefully and place in a warm, sunny spot in an area that stays above 60F. It is a perfect way to start your turmeric plant, especially if you live in northern climates.
3. Turmeric is a slow starter plant

Turmeric is a slow starter, so it will take a little while, roughly 6 weeks, to sprout. Keep the pot in a warm place, keep the soil moist, and after a while, you will see the shoots popping up out of the soil. Every root you have planted will have leaves, and if you continue to care for them regularly, eventually, you will see plumes four feet tall in ideal condition. When it gets warm, move the pots outdoors or plant in the garden as you wish.
4. After a couple of months, you will have a fully grown plant

via www.therainforestgarden.com
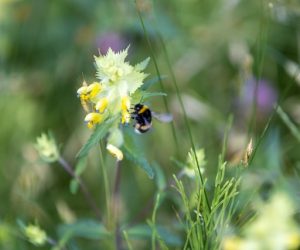
Turmeric is native to the forests of Southwest India. It is a beautiful perennial plant of the ginger family, and it can grow 1 meter tall with underground rhizomes. Being a tropical plant, it can be grown outdoors all year round if you live in zones 9 or warmer. Whether you keep it on your balcony for the summer or plant it in your garden, it will look like a lush rainforest. It produces tall, beautiful, green, and white cones of yellow flowers if clumps are left undisturbed for a year.
5. How to care for your plant?

Once your plants are established and growing well, they won’t need too much attention from you. Make sure to water less during the winter months, but water fairly frequently keeps the soil moist once the growing season starts. Once a week or fortnightly, you can apply liquid fertilizer. If you see your plant going to flower, don’t worry. It won’t affect your later root harvest; just enjoy the beautiful blooms.
6. You can grow turmeric in a container

If you live in zone 9 or warmer, your plant is perfectly fine in the garden all year round. However, the majority of people who are going to grow turmeric will have to do so indoors. Turmeric grows fine in pots, it can thrive in a sunny room, and once the weather is warm enough, you can put it on your balcony. Make sure to choose a container that is at least 12 inches across and the same in-depth to give your plants room to grow.
7. When to harvest the rhizomes

via www.thehomesteadgarden.com
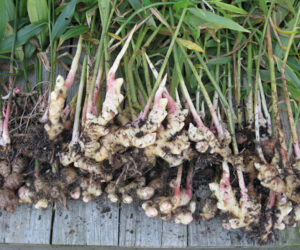
The most exciting part of growing turmeric comes when you can harvest your first batch. Usually, 8 to 10 months after planting, rhizomes can be harvested. When the lower leaves will start to turn yellow, and the stems will start to dry out and fall, that’s when your turmeric is mature enough, and the rhizomes are ready to dig up. It is also possible to just dig carefully at the side of a clump and remove rhizomes as needed rather than harvesting the whole clump. Roots can be stored in the refrigerator (or cool cellar) for up to six months. After cleaning and drying them, wrap the rhizomes in aluminum foil, and they should be fine until replanting them next Spring.
8. How to store turmeric roots
If you decide to harvest a bigger batch, just dig up the plant and cut the rhizomes away from the stems. Wash off the dirt and keep the unpeeled roots in an air-tight container. Make sure to keep it in a cool dark place, and your roots should still be in great shape for many months. To use turmeric roots, you have to peel them first. Wear gloves. Otherwise, you will have yellow-stained fingers for some days.
9. Ways to use turmeric

As the whole plant is edible, there are many ways to use turmeric in your kitchen. The roots are best to be used fresh, but you can try to make your own turmeric powder as well (see below). The fresh green leaves can be used instead of aluminum foil. Simply wrap the leaves around the fish during cooking. In Indonesia, the young shoots and rhizome tips are eaten raw. Add a small piece to your morning smoothie. Take care when using fresh as it’s much stronger in taste than turmeric powder. Use fresh turmeric in curry pastes and stir-fries for a fresh and light taste.
10. How to make turmeric powder

via www.panthiinternational.com
If you are up for the challenge of making your own turmeric powder, here are some tips on how to make it. After cleaning the rhizomes thoroughly boil them for 45 minutes. Peel off the skins and dry the rhizomes for at least a week. It will get quite hard, so you can break the rhizomes up with a hammer and then, using a mortar or a food processor, grind them until you get a smooth powder.

THIS SOUNDS GREAT I WANT TO GIVE THIS A RUN BUT I’M TRYING TO DO IT WITH A GROWING LIGHT INSIDE FOR THE WINTER AND TRANSFER IT OUT SIDE WHEN IT WARMS UP THANK FOR THE INPUT’
CAN YOU PLEASE SIGN ME UP FOR YOUR NEWSLETTERS.